|
|
Silver Core Beads - A 3pt. Article
Part I: Hard Cor(ing) and where to get some….
In this and the next 2 articles we'll take a look at some aspects of coring and capping lampwork beads with various metals and how to make your own metal tubes and caps.
But first…..you really, really need to decide what you want to do with your cored/capped bead. You need to decide on the design governing principle behind your piece of art.
Some questions to get you going might include:
The design possibilities are only limited by your imagination, and of course your technical proficiency and willingness to experiment and learn….oh, and your bank balance, too….
It's essential to make a few notes and sketches before you start to save time, effort and expense. Keep an ideas diary filled with these and anything else that takes your fancy and your "well will never seem to be dry" and your artistic muse never too far away. Let's consider the whole "Bead-System-Bracelet" thing…..if you are planning to make metal cored beads to fit on a "Pandora/Chamilia/Biagi" bracelet you will need to allow for the screw thread on the "Pandora" bracelet's end caps and for the raised stopper beads that occur 1/3 and 2/3 of the way along the length of the "Pandora" bracelets. Even though "Pandora" beads have a hole approximately 4.4 to 5mm in diameter, the inside of these beads has usually been machined with the complementary screw thread, allowing these beads to screw onto the "Pandora" bracelet and over the stopper beads.
"Troll" bracelets do not have this screw feature and are usually fractionally smaller in diameter at around 3.8 to 4.3mm. So, "Pandora/Chamilia/Biagi" beads will fit onto "Troll" bracelets, but "Troll" beads will NOT fit on "Pandora/Chamilia/Biaga" bracelets.
"Troll" bracelets have been around for over 25 years, however the concept of "charm bracelets" or jewellery, and even the idea of having intimate or personal keepsakes or talismanic jewellery, has been around for a LOT longer. (Such as pirates' earrings that supposedly denote the number of shipwrecks they have lived through, or Christening pieces, or rings….)
The most widely recommended thickness for the walls of metal coring for lampwork beads is 0.4 to 0.5mm - 26 to 24 gauge - (Kim Fields, Tim McCreight). Any thicker and it becomes harder to flange or flare the metal over the edges of the bead/caps, any thinner and the chernier may stress to the point of ripping or buckling along its length.
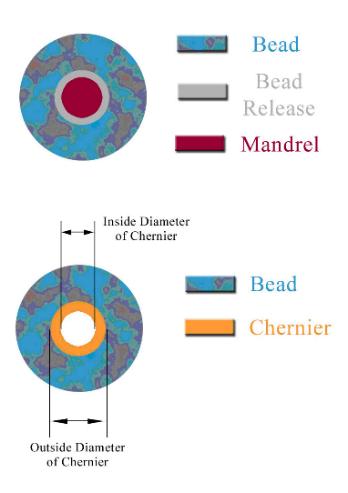
To determine the thickness of ready-made metal chernier walls, try the following calculation: OD (outside diameter) minus ID (inside diameter), and divide by 2 = wall thickness.
The outside diameter of your mandrel and the inside diameter of your bead hole are NOT the same thing. CAVEAT EMPTOR. Allowance needs to be made for bead release, and this greatly differs depending on what bead release you use, what thickness you mix it to, and how many times you dip the mandrel. Some experimentation is needed to get exact measurements here, but just to give you an idea I use Lily from Hotbeadbox's Super Strength Bead Release, mixed to a thin custard or batter consistency, and for a single dipping I get a covering of about 0.3mm all round (0.6mm diameter).
Commonly used and readily available mandrel sizes are: The Mandrels and another good Bead Release are available from Ozziebuddy in Brisbane. (Approx 0.65mm thickness dry.) The metal chernier should fit snugly inside your lampwork bead/cap so measurements are important here.
Here's a simple diagram that might help you visualise the needed calculations:
A & E Metal (http://www.aemetal.com.au) have several metal cherniers available in various metals. These include:
There is much more on their website so have a look when you get the chance!
Of course, there are many more metal merchants here in Australia, let alone overseas, that sell ready-made metal chernier or tubing, but this should give you an idea of what to look for (and be on the lookout for) and how to do your calculations.
Enjoy and, above all else, have fun!! PS…..Part 2 will include how to core and cap lampwork beads, some things to do and not to do, and what to look for in a core-able/cap-able bead. In Part 3 we'll take a look at making your own metal tubing, an alternate method to 'line' your beads in metal, and some recommended reading to further your knowledge…."Imagination is more important than knowledge" Einstein - who was making the point that we can, if we work hard enough, obtain or acquire knowledge - but if we don't have imagination….ahhhh…. |
ALL materials above are Copywrite protected.
Do not reproduce in any manner - full or partial - without permission from the Author!